How-to: Infiniti I30 / Nissan Maxima Oil Change
BY: A33
Alright ladies and gentlemen, while most people may already know how to change their oil, there’s still some people that may need some help. I’ve decided to put together a detailed how-to that will help you with your oil change and even if it’s a different vehicle than the one below, the same basic principles still apply to changing the oil in your vehicle. Let’s get started!
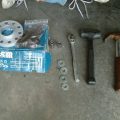
Items you’ll need:
– A wrench or ratchet with a socket to fit the drain plug on the vehicle, in this case the I30/Maxima use a 14mm wrench or socket.
– An oil filter wrench, adjustable or exact size. You may not need it, but sometimes the oil filters are on too tight to remove by hand.
– Low profile car ramps. You may be able to use standard ramps, just judge for yourself if you think they will work. You may also use a floor jacks and jack stands, but I recommend ramps for increased safety.
– Something to chock your rear wheels with. Wheel chocks can be purchased at your local store, or you may use bricks as well if you can’t find anything suitable.
– Gloves. I recommend rubber coated work gloves personally, but you can use normal latex or nitrile disposable gloves as well.
– An oil funnel.
– Then of course your oil and oil filter:
Oil: 5w30 Motor Oil is recommended by the manufacturer. I personally use a Synthetic Blend at minimum, but normally run a full Synthetic. In this case I purchased Mobil 1 Extended Performance, which is rated for 15,000 or 1yr change intervals.
Oil Capacity(According to manufacturer) – With Oil Filter: 4 1/4 qts Without Oil Filter: 3 7/8 qts
Oil Filter: Part number varies depending on brand you choose, so check with your local Auto Parts supplier to get the proper one for your application. In this case the part number was M1-110(Mobil 1)
First of all you’ll want to drive your vehicle onto the ramps, making sure that the ramps are lined up properly with your tires before doing so. Make sure to gently drive the vehicle up then, you should feel the tire bump into the area that it will rest in, once you’ve reached the top. After doing this, firmly apply your parking brake, then get out and check the vehicle.

Ensure that the vehicles tires are safely resting on the ramps before continuing:

Now you’ll want to chock your rear wheels, to ensure that the vehicle doesn’t roll:

Once everything is safely secured, you will need to slide underneath the vehicle and locate the oil pan(pictured below), which is on the passenger side of the vehicle, then locate your oil drain plug(marked in red):

Using your 14mm wrench(or socket), loosen the drain plug until it can be turned by hand BUT DO NOT REMOVE YET:

Next locate your oil filter, which is to the left and above the oil pan, and slightly loosen it BUT DO NOT REMOVE YET:

Now place your oil drain pan underneath the vehicle, making sure it is placed underneath both the oil drain plug and oil filter. Now remove your oil drain plug FIRST, allow it to drain into the pan then once the draining has slowed, remove your oil filter and allow the oil to drain into the pan as well. Turn the oil filter over and allow some of the oil to drain from it as well, then turn it back upright and set it aside on a rag or towel:

Go grab yourself a beverage and allow the excess oil to continue draining for a few moments:

Get your new oil and filter prepared, in this case we will be using Mobil 1 Extended Performance 5w30 Oil and Oil Filter. This oil is rated for 15,000 miles or 1yr change intervals:

Next your will replace your oil drain plug and install the new oil filter onto the vehicle. Tighten the oil drain plug snugly but do not over tighten it, then install the oil filter by hand, turning it until it feels secure by hand.
NOTE: I recommend taking your new filter and rubbing a small amount of the old oil from the drain pan around the seal of the new filter, which helps give the filter a better seal. You do this by simply dipping the tip of your finger in the old oil and lightly running your finger around the seal.

Next we will refill the crankcase with the new oil, first you will open the hood by locating your hood release inside the vehicle. In this case, it’s located underneath the left side of the dashboard on the drivers side(Pictured below):

Now you will go around to the front of the vehicle and locate the hood release underneath the grill, which is highlighted in red:

You will release the latch, as pictured below, by pushing up on it with your hand. Once doing this you will be able to raise the hood:

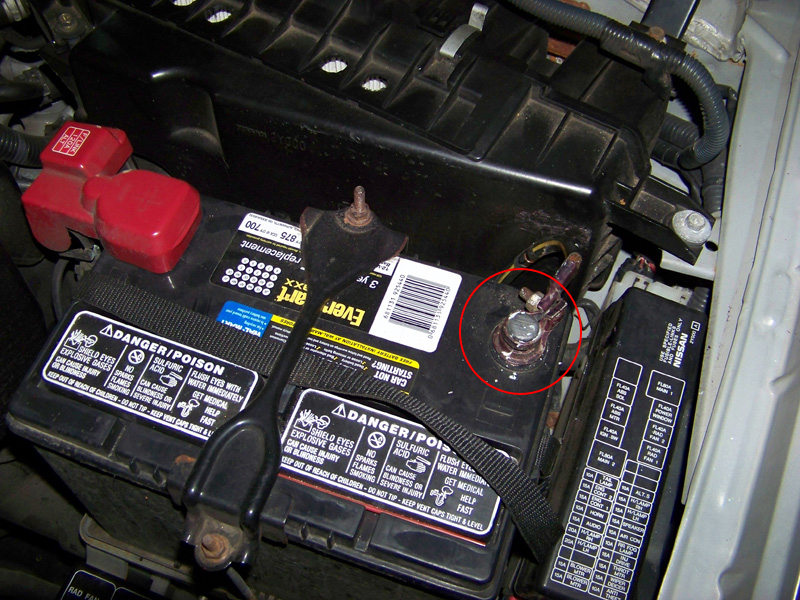
Next you will locate your oil filler cap, highlighted in red below:

Now you will want to grab a funnel to pour the oil in with. It’s not required, but it helps you avoid a potential mess:

Remove the oil filler cap:

Place the funnel in the oil filler opening:

Begin pouring the oil into the funnel, again this vehicles oil capacity is 4 1/4 qts of engine oil, with a new oil filter:

Once the oil flow from the bottle decreases, turn the bottle all the way down and allow it to sit in the funnel for a few moments:

While you’re waiting for each quart to empty out, it’s a good idea to check your serpentine drive belt, which is located on the left side of the engine. It’s in a tight spot, but try to inspect for cracks or obvious breakdown of the belt:

Once you’ve added 4 1/4 qts of engine oil, you will replace your oil filler cap:

Next you will get inside of the car and start the vehicle, I also recommend backing it off of the ramps during this time. After doing this, you will shut the vehicle back off and check your oil level. First by removing the oil dipstick on the front of the engine block, wiping it with a rag, replacing it into the engine, then removing it again. This should give you a proper reading:

Replace the dipstick in the engine and you have completed your oil change!
Also some other recommend items that you should check and replace if necessary at each oil change:
Check your Air Filter: The air filter is located on the right side of the engine. Remove the clips on top of the air box that hold it in, remove the plastic holder, then remove the filter from inside the air box. Inspect for dirt and grime, if the filter is dirty, then you should replace it. This can help increase fuel economy and overall engine performance.
Check your Tire Pressure: Purchase a simple tire gauge if you don’t already own one. The recommended tire pressure is usually inside of one of the door jambs on the vehicle, or in the owners manual if you have it. This can also help increase fuel economy, ride quality, and vehicle performance.
Check your Belts and Hoses: You should always regularly inspect your belts and hoses, checking for cracks and wear in belts and hoses that are have bulges, cracks, or dry rotting. It’s much better to be aware of their condition, rather than finding out on the side of a busy interstate or back road one day.
Check your fluid levels: It’s also always a good idea to make a habit of checking your other fluids as well. Check your Anti-freeze, power steering fluid, brake fluid, and transmission fluid for proper levels and overall quality of the fluid. Brake fluid and power steering fluid are usually rarely required to be changed, but you should keep a check on your anti-freeze and transmission fluid every 2-3 oil changes and also keep them changed according the recommended service intervals by the manufacturer.
Well that’s all for now, I hope this article provides you with the information and tools needed to do a proper oil change on your vehicle. Thanks for reading!
If you have any questions or comments, here’s the place: Do it yourself Nissan Oil Change
-Chris Longino, A33