By: scarboroughdub
Overview:
Well I have finished the installation and with minimal problems the car runs off the new board now, the current program that is in there is a stock na ka24de s14 bin with some tweaks from yours truly.
I must say the car feels much smoother and more responsive then with the oem setup.
Either way here is a step by step and what is needed to get it done.
Difficulty: ****
Time: 2-4 hours
Cost: ~$300-$500
Tools:
-philips screw drivers(small and medium sized)
-fine tipped soldering iron (radioshack) no more than 30watts
-0.8mm light duty solder (radioshack)
-fine tipped knife
-Household vacuum
-drinking straw
-electrical tape
-wire strippers or sharp knife
-steady hands
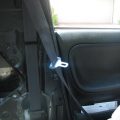
Step 1get your ecu from the car

Step 2 remove both top and bottom ecu covers using the larger philips

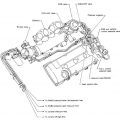
Step 3 removing solder from the 40×1 header on the ecu
What you will do is get your electrical tape and drinking straw and tape it to the nozzle sealing it air tight with the electrical tape.
Be sure to also put some tape on the tip of the straw this will act as a seal and also prevent static arcs
Everybody knows never use a vacuum around electronics… well a traditional solder sucker wasn’t cutting it and this method took me a total of 2 minutes.
Once you have it rigged up stand the ecu up and from one side apply the straw with the vacuum on and from the other heat up the solder with the iron once the solder heats up and melts the vacuum will suck it up.
Here is the 40×1 header with all the solder removed and cleaned and ready for the next steps.
Front of the board

You may need to use the soldering iron afterwards to clean up and pick up some of the left over solder. make sure there are no shorts in between each hole.
Step 4 inserting the 40×1 ribbon

This is a simple process just make sure each pin is going in straight and verify on the back side. this applies to both the biki board and ecu.
Step 5 solder the 40 pins on both boards thats 80 pins.This is the most nerve wracking part of the process.
Once the pins are sticking out what you want to do is place the 0.8mm solder at the base of the board where the pin comes out through the holes and while your holding your solder there touch the tip of the pin with the soldering iron. once you see the solder melting allow this to happen for about 2-3 seconds, what this does is it allows the solder to flow down the hole and builds on top giving you a proper connection.youll notice that from the other side the hole will also be filled with solder.
Repeat this step 80 times and your almost there.
Once your done your ribbon should be soldered on both the bikimegaboard and your ecu.
Step 6 soldering the consult wires.
The three wires that you are concerned about are the BLUE,GREEN,YELLOW
wires. take them and run them through the side of the ecu to the under side, leaving the RED and BLACK wires up top.
You will solder these wires to the 3 pins on the underside of the ecu
Blue – pin 65 (TX out)
Green – pin 64 (RX in)
Yellow – pin 68 (SCI CLK)

The way i did this is strip only 2 mm of the wire tip to expose the bare wire and heat it with the soldering iron and then melt some solder onto the wire this will keep all the individual wires together.then heat up the pin on the ecu and dab a small amout of solder onto it, once done heat the solder up that you just dabbed and apply the wire to the melted solder once it cools your connected.be careful not th use too much solder.
The RED and BLACK wires get soldered to the pins on the top of the ecu
Red – 12v Pin 38
Black ground pin 106

This is simple just strip the wire and solder it on.
Step 7 checking everything
Go over every solder point with your eye under a good light and with a magnifying glass to see if you might have soldered 2 pins together accidentally.This is very important and i suggest you triple check.
Step 8securing the Megaboard to the ecu

This is simple just be snug with the screws make sure to not over tighten.
The usb port will not fit until you bend the red L.E.D over once done it will fit fine

The Tools

And that is it now you can go fire up the car and it will still run on the internal rom until you remove jumper R001 on the backside of the board.

The reason you want to leave the jumper in place is so that you can copy your ecu’s original program and save it.Once you’ve done that you can remove the jumper by heating it with the iron and prying it away, at this point the ecu will read its bin file off the megaboard.
I have noticed that you need to have certain programs from microsoft to make the bikisoft software work properly so you will need
service pack 2
.netframework version 2.0
.net download