Tools required for ignition swap on CA18
1. Eliminate need for COP and Nissan ignitor
2. Convert ignition to GM waste spark DIS
3. Coils last longer from cooler operation and are cheaper, easier to get
4. Ignitor is readily available new and used
5. Hot ignition spark (modified dwell map)
6. Easier to check your timing with timing light/gun (no special tools or rigging required)
7. Cleaner possible emission from waste spark
8. Easier to maintain
9. Improved aesthetics, no need to run without the coil cover
– Soldering knowledge or basic wiring skills
– Socketed ECU
– eprom optional but recommended
– NGK spark plugs gapped 0.7mm (0.028″)
– PnP (Plug and Play)
– COP (Coil on plug)
– OEM (Original Equipment Manufacturer)
– DIS (Digital Ignition System)
– GM (General Motors)
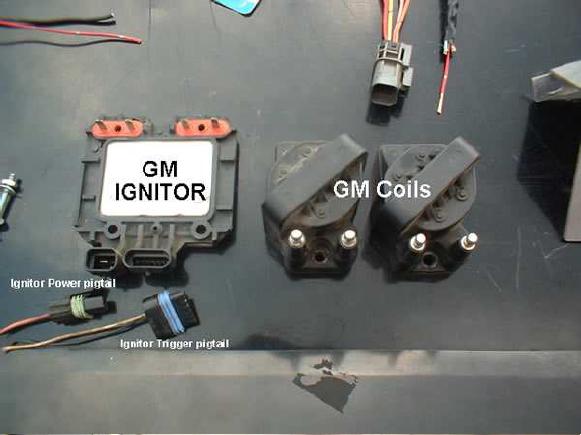
– GM Harness pigtails
– GM Coils
– GM Ignitor
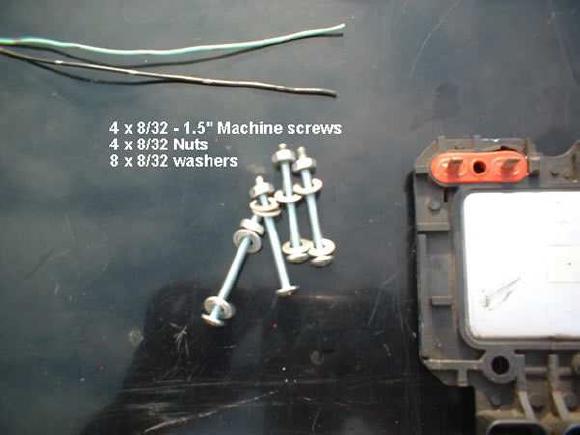
– Mounting hardware
I raided the local junk yard to find a Nissan or Infiniti with the 2 Male plug ends needed to make this harness.
Parts List:
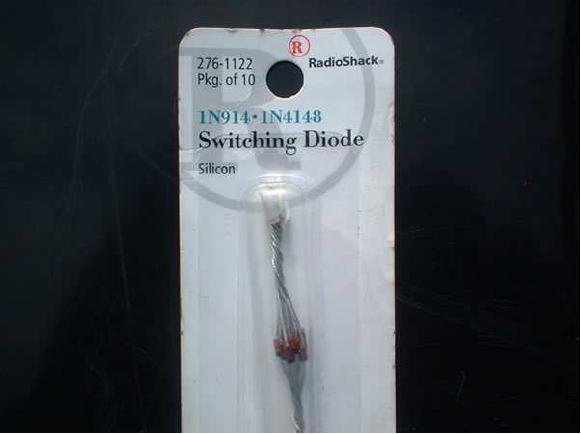
– 4 x 1N914 high speed switching diodes
– radio shack pre-drilled board (optional)
– High temperature electrical tape
– 1 x GM ignitor power pigtail
– 1 x GM ignitor trigger pigtail
– crimp on round connector with 6mm (0.25″) hole
PnP harness wires
Step 1:
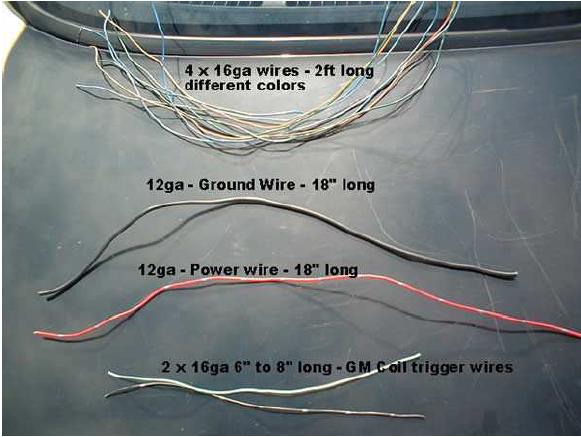
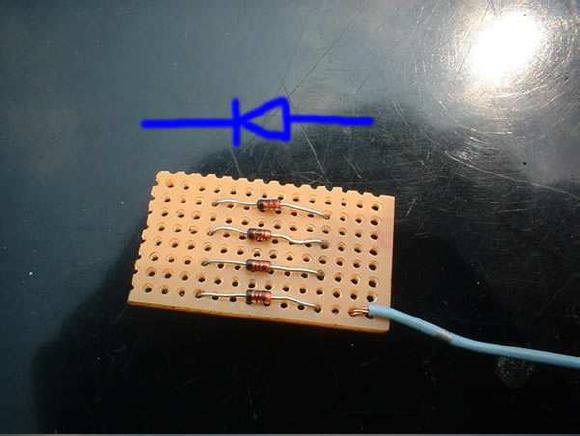
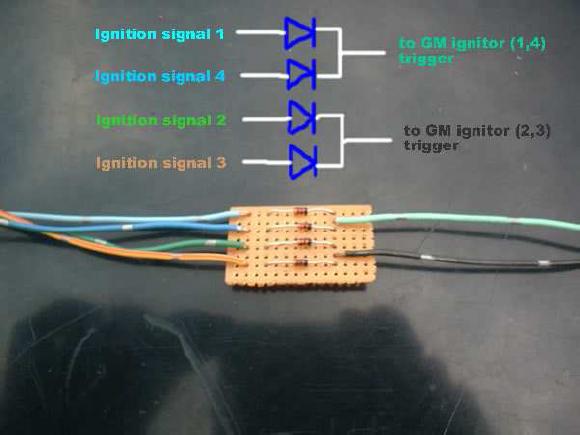
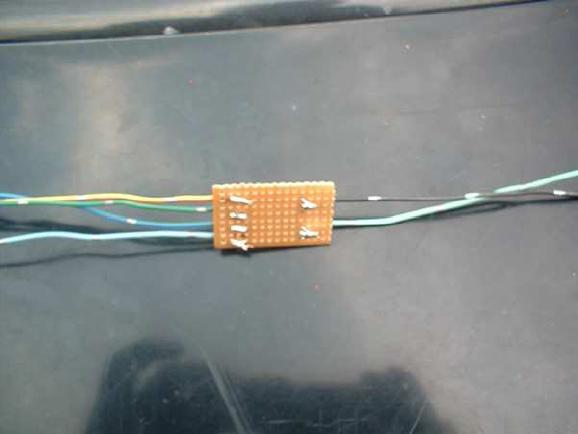
Start by soldering the (4) 24″ wires, diodes and (2) 8″ wires together. I used a pre-drilled board from radio shack to complete this part:
Step 2:
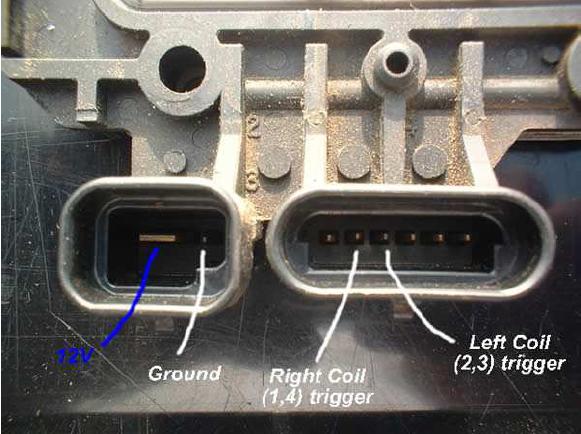
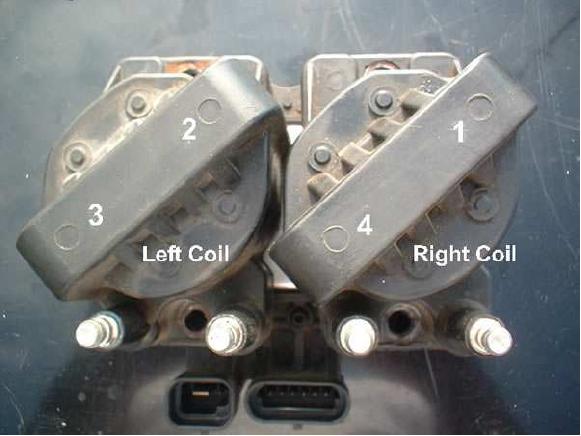
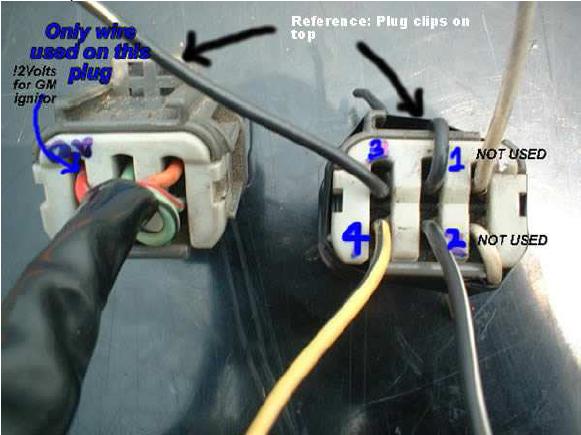
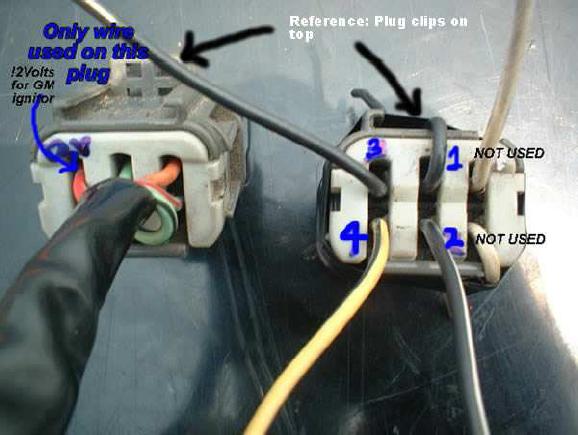
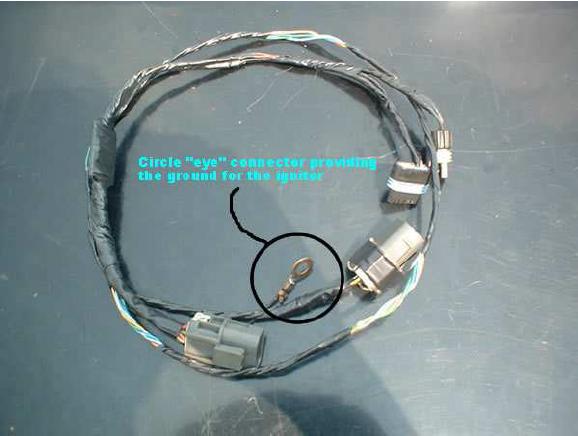
Connect the 4 free ends on the 24″ wire to the male oem connector as in the diagram (right plug). Match up the ignition 1 – 4 wires as labeled in the diode pic above with the appropriate signal connection on the male plug. The red power wire can also be connected with the other male plug (left plug). This is the only wire used from this plug to provide the switched 12V for the GM ignitor. The other end of the 12V wire goes to the matching pinout on the GM ignitor power pigtail. Crimp the circle “eye” connector onto the ground wire and the other end to the matching ground on the GM ignitor pigtail:
** Completed Plug and Play Harness **
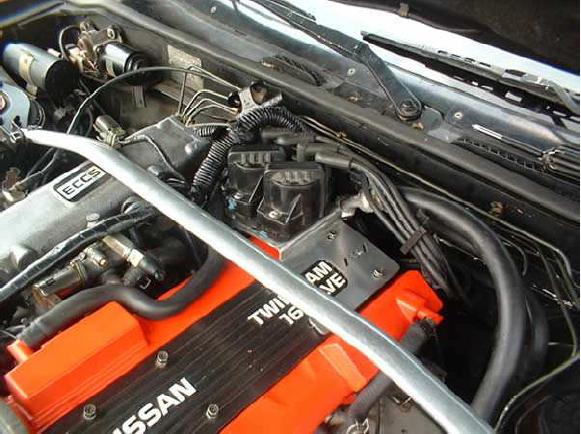
– Remove the Coil plug cover
– Remove OEM COP setup including the coils and harness
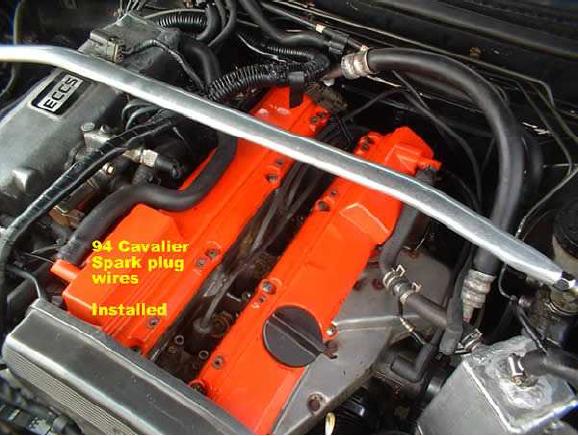
– Install the spark plug wires. I used wires for a 94 Cavalier. Although the 7mm wires work, try to upgrade to a 8mm wire.
– Label the spark plug wires 1,2,3,4
– Replace the coil plug cover
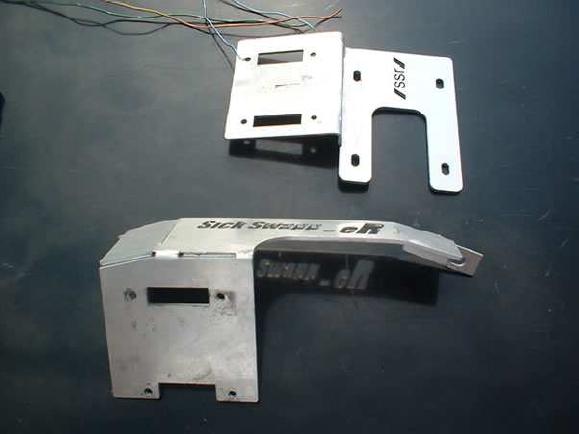
Try to locate the Coils and ignitor somewhere in the engine bay that would allow convection cooling of the coils. I chose either of two methods using custom aluminum mounts:
Mounting brackets
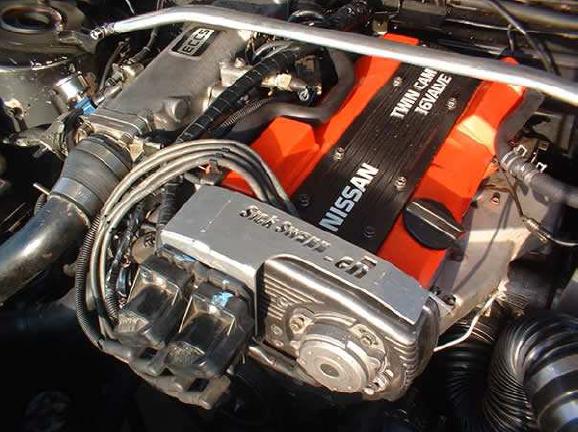
1. – Mount the GM coils and ignitor in a front mount configuration
The following are required:
– Front aluminum plate/ heat sink, grounded
– Electric fans
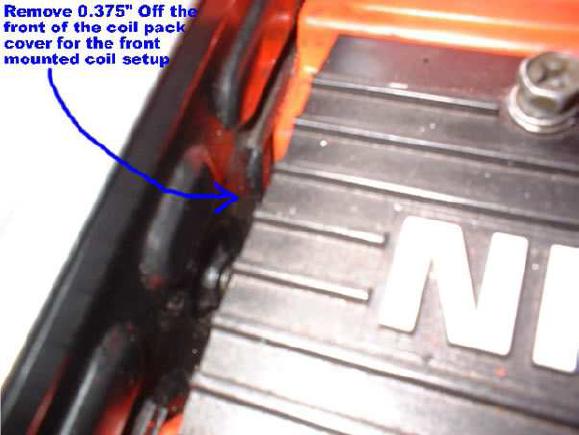
– Modify the coil cover by removing 3/8″ from the front of the coil cover
PROS:
Cooler operation
Easier access
Lots of space
Cooler than oem coil operation
CONS:
Longer spark plug wires required compared to top mount setup
2. – Mount the GM Coils and Ignitor in a top mount configuration
The following is required
– top mount aluminum plate/ heat sink, grounded
PROS:
Shorter spark plug wires compared to front mount
Cooler than oem coil operation
CONS:
Coil runs a bit hotter compared to the front mount configuration
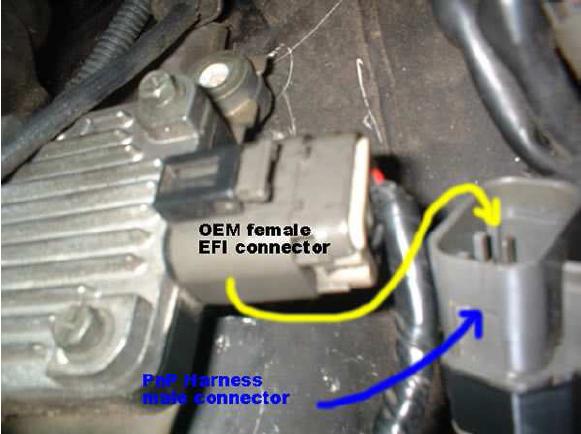
– Plug in the GM end of the harness to the Ignitor
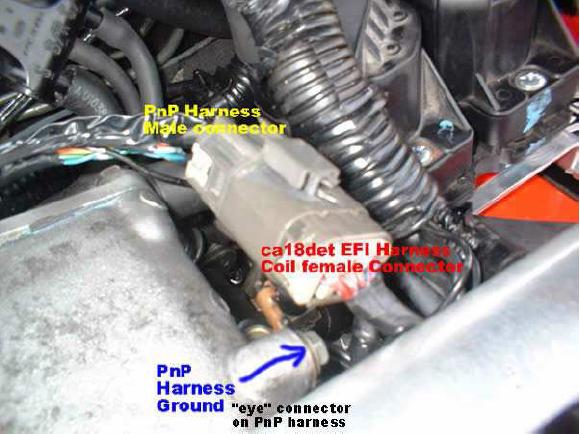
– Plug in the shorter 6 pin male PnP plug for the 12V switched power to the ca18det EFI harness female connector where the OEM COP harness originally connected. Connect the ground wire of the PnP harness with the crimped on connector to the EFI harness ground on the side of the intake manifold.
– Disconnect the bigger 6 pin female connector from the oem ignitor. The other plug can be removed as well since the oem ignitor is no longer needed in the engine bay. Basically up to you.
– Plugin the other longer 6 pin male plug on the PnP harness to the 6 pin female connector on the oem efi harness. For euro models S13, this connector is part of the main harness but essentially the same plug.
Check all your connections
Start the car – The engine should idle and rev normally under no load
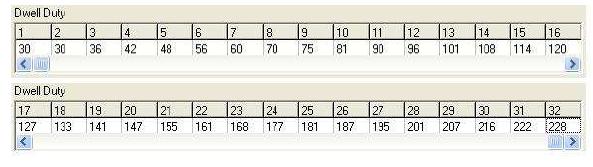
In order for the coils to function properly the following changes MUST be made to the dwell map on the eprom. You can use ECUEdit to make this change or if you’re using romedit, you can setup one of the additional maps with the hex location for the dwell map. These settings provide a nice hot spark while still maintaining cool coil operation. I’ve tested the spark to 15psi with no breaking up with my GT3071R turbo. 20psi should be more than capable for this setup without blowing out the spark.
the ca18det dwell map is located at H3890 and is 32bits long
Article Contributed By: 50-50
NICOclub is back again with Carlisle Events to host our 18th annual NICOFest Carlisle AutoX…
Kraft Auctions Offers Fans a Chance to Own a Piece of Datsun Racing History
We built Datsun Ranch in 2014, and it was the culmination of a lot of…
Since it's not just Datsuns that are vintage anymore ("classic Nissan" still sounds weird, right?),…
Let's talk about big brake kits for a bit. For the purposes of this article,…
What do these terms mean? Pulsed Secondary Air Injection (PAIR) Valve: The PAIR valve sends…