| 1991-1994 Nissan 240sx |
This article will cover how to fix an incorrectly installed lower timing chain without removing the lower front cover. If you have to turn your distributor all the way to the right or left to get it close to correct timing, chances are this is your problem. If you can not get your distributor to line up how it is supposed to, this also might be your problem. This made timing a living hell for me, and I finally figured it out.
240sx KA24DE Timing Chain Kit and Timing Cover NEW!
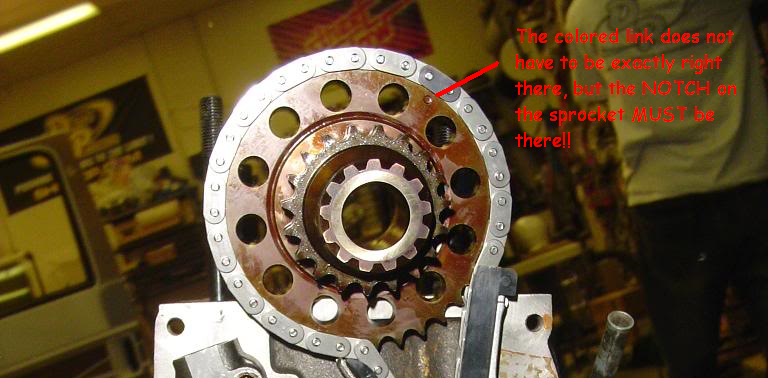
Note: if you are rebuilding a KA24DE, ALWAYS line up the colored marks on the chain!! The chain IS just a chain, but the idler sprocket MUST be in time with the crank sprocket!
1. Set your motor to TDC on compression stroke. What I do is take out my #1 spark plug, then reinstall the spark plug boot. I crank the motor over until the boot comes flying out, and then I put a socket on the crank pulley, and set it to exact TDC. Should look like this:
MAKE SURE NOT TO TURN THE MOTOR AT ALL DURING THIS ENTIRE PROCESS.
2. Take off your valve cover (10MM bolts)
3. Take off your front timing cover, 12MM socket
4. Remove your cam sprockets, upper tensioner, and cam chain.
5. Now take a look at your idler sprocket (the sprocket that bolts into your cylinder head). If the notch on the sprocket is not exactly where it is in this picture, then you need to fix it. Loosen the idler sprocket bolt, you’ll need either an impact or breaker bar, BUT DON’T TAKE IT OFF YET. You have to find a way to keep tension on the lower chain, or else it will collapse and skip teeth and cause you to have to take off your whole front cover, which is a pain. I used my EGR tube and shoved it between both sides of the chain. Once you do that you can take it off.
8. Reinstall the upper tensioner (QUARTER TURN PAST SNUG OR IT WILL STRIP), take out or replace your timing chain guides if you still have them.
9. Make sure everything is perfect one last time, then install upper front timing cover with RTV.
10. Install valve cover.
11. Install distributor with the rotor pointing directly at #1 spark plug. If S13, it should be perfectly horizontal, if S14 it should slightly point up.
12. Done!
I hope this helps a few people out. I know that this is not a common problem, but it happened to me, so it must happen to other people too.
Ready for some more 240sx helpful hints and tips? Check out www.240sxTech.com!
NICOclub is back again with Carlisle Events to host our 18th annual NICOFest Carlisle AutoX…
Kraft Auctions Offers Fans a Chance to Own a Piece of Datsun Racing History
We built Datsun Ranch in 2014, and it was the culmination of a lot of…
Since it's not just Datsuns that are vintage anymore ("classic Nissan" still sounds weird, right?),…
Let's talk about big brake kits for a bit. For the purposes of this article,…
What do these terms mean? Pulsed Secondary Air Injection (PAIR) Valve: The PAIR valve sends…