NICOclub

The Nissan and Infiniti enthusiast community - Repairs, modifications, resources and much more!

  • Nissan Forums
  • Infiniti Forums
  • Truck & SUV Forums
  • Datsun Forums
  • Marketplace
    • Advertise on NICOclub
    • Advertisers Directory
    • Fabricators’ Marketplace
    • Classified Ads
  • PRODUCT REVIEWS
  • TEST DRIVES
  • SERVICE MANUALS

S14 Climate Control Panel Bulb Replacement

December 10, 2009 by Aaron

bysteveS14

Overview:

Ever had those stupid bulbs in the climate control go out on you? well they did on my car and it’s damn annoying to drive at night and have to guess at which button to push to get my feet toasty or get some fresh air on my hands and face.

Difficulty: ***

Time: 1-2 hours

Cost: less than $20

Tools:

– screwdriver

Materials:

– 2x bulbs for the temp bar, PN# 27545-50j00
– Fan switch bulb PN# 27545-50j05

Procedure:

There are 3 bulbs that light up the unit, one lights up the fan speed numbers, one for the upper buttons with the pictures of stick man sitting down with arrows pointing at him, and the last one lights up the lower part of the unit which is the a/c button and the blue/red bar. make a note first about which bulbs are out so that way you which ones need to be replaced.

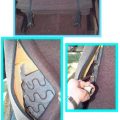
Remove the upper console and vent assembly by tilting the center vents down and grabbing the console like in the picture and pull.

Remove the 4 screws then unplug it and remove it from the dash

Turn the unit around and pull up on the 3 tabs to remove the cover.

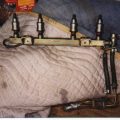
After the cover is removed, there will be a circuit board held down by 3 clips. squeeze the clips with needle nose pliers while gently pulling up on the circuit board.

Lift the circuit board and underneath will be another circuit board with the bulbs on it. in the picture the bulbs are removed, and the fan switch is removed to show all the bulb locations.

To get at the bulb that illuminates the fan speed, the fan switch needs to be removed. this is done by first pulling the knob off and then prying on the three tabs (one at the top and 2 at the bottom) while pushing on the front side of the switch with your thumb.

top

bottom

After all the burned out bulbs are replaced, test the unit first by plugging it in first before reassembling it.

Filed Under: 240sx Articles, Nissan articles

Related posts:

Low-budget seat modification for S13
240sx NOS Direct-port Wet Kit Install: SOHC
240SX How To: Remove / Replace your power steering pump
240sx: Paddle Shift Conversion
Vroom-Chirp’s Lit Sleepy Eyes Writeup
LED interior lights: Trunk Lamp
DIY JGY Turbo Manifold for KA
Installing an oil cooler on an RB25DET
How To: Refinish / Replace Your Headliner
How to: Repacking Wheel Bearings

Search NICOclub.com

Sponsor

Nissan Infiniti Online Forums Nissan 240sx technical information Nissan technical information Infiniti technical information Nissan Infiniti Road Tests and Reviews Nissan Infiniti Related Articles Nissan Infiniti Technical Information Articles Nissan Infiniti Events and Shows

Sponsor

Recent News

2021 Nissan Altima: Everything you need to know

6 Ways to Prepare your Car for Spring and Summer

Help! My Nissan is stuck in ‘Park’ – Here’s the fix.

Important Info for 2002-2018 Nissan Altima Owners

OnlineTires.com and GLS Shipping Race to the Bottom

D21 Hardbody Rehab and Restoration

Audew Power Station Jump Starter Review

Protect Your Shop During the Pandemic…

Sponsors

Sponsor


NICOclub's Nissan forums and Infiniti forums and all affiliated sites are the property of HDS Holdings, Inc. They are independent publications and are not affiliated with or endorsed by Nissan or Infiniti. Information Copyright © 2000-2021 by NICOclub, all rights reserved. Material may not be copied or reprinted without written permission.

NICOclub Sitemap | NICOclub Privacy Policy

Copyright © 2021 · NICO Club 2014 on Genesis Framework · WordPress · Log in