I’ve been searching for some good HID projectors to retro into my Silvia front.those with the Silvia know how poor the output of those lights are. the cut-off is nice but the output seems lacking.if you think they’re pretty good, I guess i just have some high standards for lighting.i haven’t tried re-based bulbs in the Silvia projectors, but if you do that, your cutoff is going the wrong way and you’ll be blinding everyone driving towards you, not cool. “but it will be mad tyte JDM **** yO!”seriously, its lame, don’t do it.
Difficulty: ****
Time: 8-12 hours
Cost: $100-$200
Tools:
– Dremel or cutting tool
– heat gun
– screwdrivers
– needle nose pliers
Materials:
– TSX projectors, HID or Xenon (Xenon lenses have reflectors that will increase light output of whatever setup you use)
Procedure:
This took me about 3.5 hours to do (just pass side).If this is your first retro, it might take a hell of a lot longer (this is my 4th).
I won’t get too detailed because this is custom work, no matter how detailed I am, you’ll never get it. Besides, everything is a little different so you might see a way to do it thats a lot better than mine.Also, I wouldn’t recommend this to someone who isn’t very handy with tools like a screwdriver or Dremel.
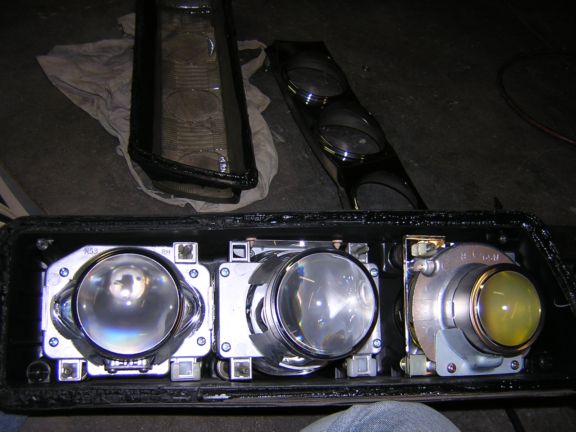
Start off by taking off the lens. Take off the 4 clips first, then you heat up the lens around the edges with a heat gun (my pref over the oven, you put food in that thing! what are you thinking!?) I have a cheap heat gun so i hit it with high and brush over the whole thing slowly. If you stay on one spot too long, you WILL melt your housing. When the black sealant becomes nice and glossy, thats means its pretty soft. Take a flat head and start to pry out the lens at the corners because they are a bit stronger than the sides. Try not to warp or bend the housing.if you have suction cups, you can try to put it on the lens and pull it off. Be careful, then glass lens will be hot. As you pry, keep returning with the heat gun to keep the glue soft as you go.be careful not to get the glue on the bezel. Once its off, heres what it’ll look like:

Next, you’ll want to take off that smoked bezel. I didn’t know it was smoked till i got it out. From the outside, it just looks chrome. Anyways, to get it off, theres two screws at the top and the bottom is held in by 2 ball joints, one on each side. You can get it out with a flat head. Pry carefully, don’t damage it.
To get out the projector, remove the top right and bottom left adjustment screws. Take an 8mm or Phillips head and unscrew them from the back where you would adjust them. The bottom right is a ball joint. Half way screwing out the other two, you’ll want to pop that joint out with a flat head or any other method.
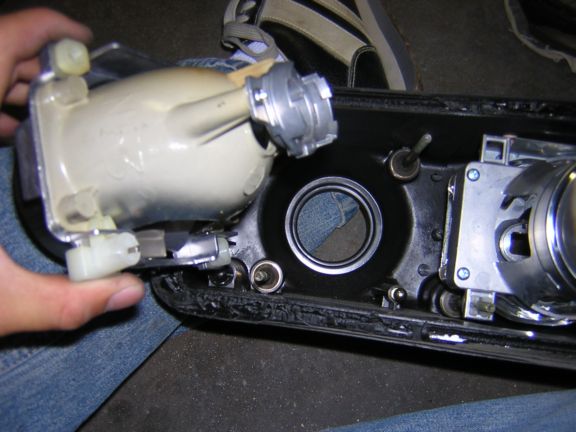
So heres where the custom part comes in. Depending on what projector you use, you probably can’t do it my way but heres basically what i did:
Take out the 3x clips from the Slivia projector. Be very gentle with these.They are probably very old and very brittle. you don’t want to break off more than 2 of those legs. i broke 3 off one of them. that set me back a good 15 mins to figure out a way to get around that.

Trim the new hid projector so that it’ll fit in the space where the Silvia projector was. Fabricate some brackets so you can use the old clips. A lot of cutting, eyeballing, putting on, taking off, bleeding (be careful), more cutting, trimming, adjusting, etc… is going to happen. Once you get your brackets correct, you can put the projector in just like it was the Silvia unit. This way you can still adjust the up/down/left/right just like normal.
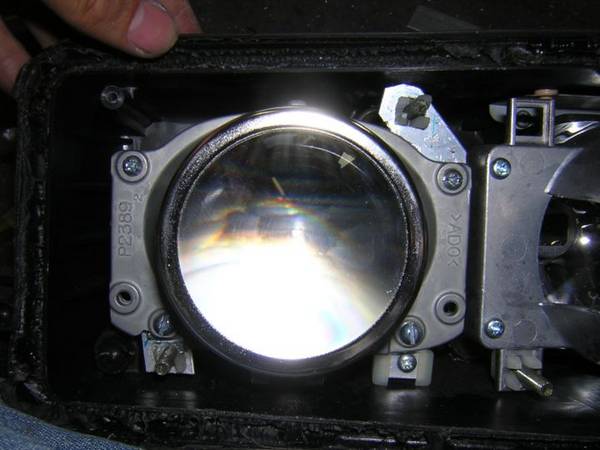
Depending on what projector you get, you’ll probably need to cut open the back a bit to allow for more room. Then you’ll need to figure out a way to close it back up. it doesn’t need to be sealed, but you’ll need to protect your electronics from water. luckily, with the TSX, i only had to cut a little off.

THIS PART IS VERY IMPORTANT: it might look level when you look at it, but when you turn them on, it will not be. Best way to adjust this is to mount them back on the car with the lens off and fire them up. Shoot them onto the garage door because most of them have horizontal lines you can compare with. Make sure they are level, otherwise, your cutoff will look bad.
When its level, straight, etc, you’ll want to put the bezel back on. the TSX has a clip at the bottom of the lens to hold the lens in. This part hits the bezel so I had to trim it a bit to get it to fit. If you get a 3″ lens projector, you might have to trim a lot more than what i did. When the glass lens is back on the headlight, you cant see where it’s been cut.

When the bezel fits on to your satisfaction, you’re ready to put the glass lens back on. By now, the glue is probably pretty hard again. Use the heat gun and heat up the glue in the housing till its nice and glossy. Then heat up the glue around the edge of the glass lens just briefly as well till its glossy. don’t heat up the glass too much cause it’ll get too hot to hold and you’ll “drop it like its hot, drop drop it like its hot!”
Put the lens to the housing and be careful not to get the glue on the bezel, and start pushing them together. At the same time, use more heat to keep it soft if needed. Once it’s close enough to get the clips on, clip them back on and they will pull and hold the two together. When the clips are on, keep applying some heat to the edges to get the glue on both halves to melt together and create a water tight seal. If you bent out the housing when you were prying, this is a good time to use some heat and try to bend it back. by this point, since you have clips, you can mount it back on the car.
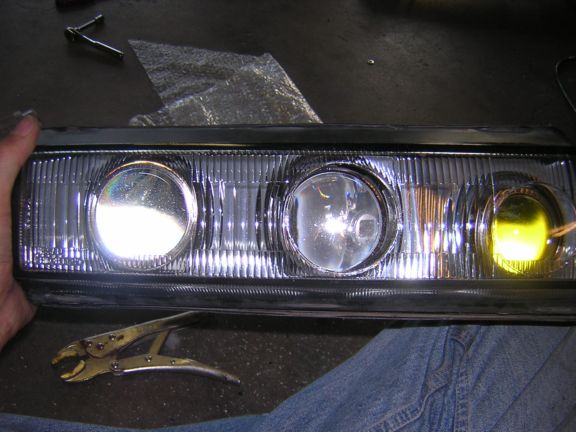
Here’s my finished product. As you can see, it looks just like stock. No one will ever suspect its retrofitted until i turn them on. They can be adjusted for up and down, left and right, just like before. Also, when the glass is off, you may want to take that time to do whatever cleaning to it you want, especially on the inside.
Basically, when you get an HID setup, the ballast will have two wires coming out of it. one is +12 and the other is ground. The stock wiring harness might not be strong enough to start up the HIDs. i think its like 75 or 85 watts to get them to start, then it slowly steps it down to 35w(warm up). so in this case, you’ll need relays and to use your stock harness as your switch. If you already have that harness that keeps your low beams and high beams on at the same time, then you should be set. Just make some connectors and plug them in and enjoy the light.
Any TSX projectors will do. i don’t think they’ve changed it yet. I got it for about $145 shipped but you can find cheaper. I’m not sure if Acura sells them new, unless you want to buy the entire headlight new but thats probably not very cost effective. Oh, and $145 + shipping is just for the projectors, no bulbs or electronics. I’d consider them very good bang for the buck. Not as bright and sharp as s2k, but close, and half the cost! Besides, the new s2ks aren’t as sharp as the previous ones. Try eBay and http://www.hidplanet.com. Also, you’ll want to make sure the projector will fit with your application. You’ll want to find one with a 2.5″ lens, s2k, Valeo, Bosch, etc…
I’m a huge fan of projector HIDs!