During our first installment of Project G37, we began by taking the car to the track and determining its weak points in stock trim. We found a few things that we knew needed to address as our first mods on the car. First we determined the car needed an oil cooler, which we added in Part 1. We also saw issues with the brakes. In Part 2, we went ahead and skipped the brakes and put on a set of BC Racing coilovers. Now we are going to take a step back to address the brake and clutch issues and take the car to the track to test our mods.
If you remember back in Part 1, we mentioned having problems with brake fade after being on the track for a bit. Also, although the stock 4 piston calipers in the front are massive, they were designed to work with OEM brake pads for quiet, yet semi-aggressive stopping power. However we want to work on increasing the stopping power while we’re fixing the brake fade problem.
We didn’t want to spend thousands on a big brake kit, nor did we think it needed it, but we did want to increase the performance. We called up Hawk Performance to see what they could do for us. They sent us their Hawk HP+ brake pads, front and rear. These pads are a proven performance pad and they just released them for the G37. They have two brake compounds available for the G37 right now. The HP+’s that we chose are the more aggressive of the two, but they also have HPS pads if you want something closer to an OEM replacement. Because we plan on tracking the car, we went ahead with the HP+’s.
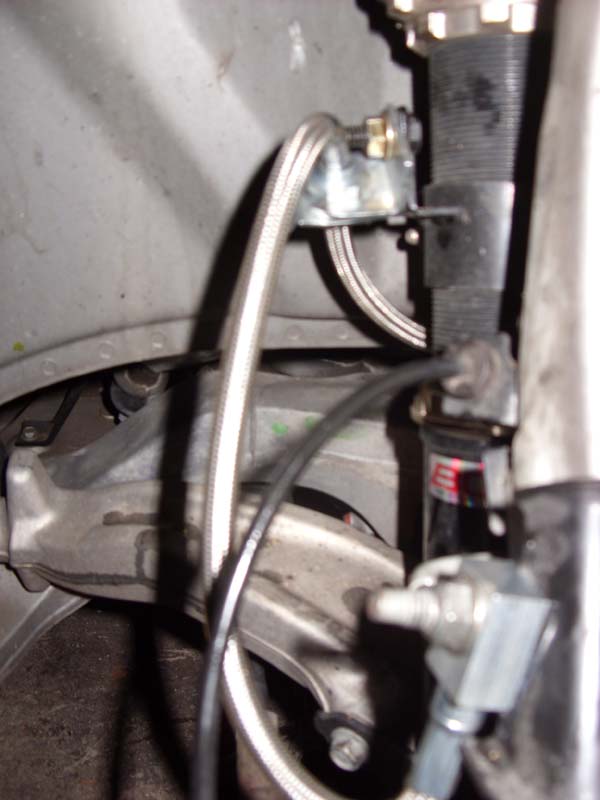
In addition to the new brake pads, we also chose to upgrade the brake lines. For these, we contacted G-Spec Performance. They didn’t have anything for us at the time, so we worked with them on a solution. After a few test fitments, they had some stainless steel braided brake lines developed just for us. By switching to braided steel lines from the stock rubber lines, this will maintain consistent brake pedal pressure. Because the steel lines do not expand like the stock rubber ones do, you don’t have the wasted pressure of expanding the rubber, and instead increased pressure on the pad. G-Spec Performance now sells this brake line kit, so if you’re using our Project G37 as a guide to build your own G, you too can get these brake lines here.
Installing the brake lines is a rather straight forward process. Because you have to bleed the brake system after installing the new brake lines, we chose to pump out the original brake fluid and go with a higher temperature brake fluid. We chose Motul 600. Typical DOT 3 and DOT 4 brake fluids have a boiling point between 400 and 500 degrees Fahrenheit. Motul 600 has a boiling point of 600 degrees Fahrenheit. If the boiling point of the brake fluid is too low, excess brake temperature can cause the fluid to boil. When the fluid boils, it creates air bubbles inside the pressurized system. Because air is compressible, when you apply the brakes you compress the air in the system instead of forcing hydraulic pressure to the calipers. In other words, your brakes don’t work. It is rare that this would happen in day to day traffic, but this very well could be one culprit in our experienced brake fade while on the track. To prevent it, by upgrading to a higher temperature fluid, we can heat the brakes up another 100-200 degrees without worry of the fluid boiling.
Our first step was pumping out the original fluid. To do this, we first disconnected the battery so we could get all the fluid out of the ABS actuator also. We then opened up each bleeder, one at a time, while pumping the brake fluid out. After we had all the fluid out, we then installed the new brake lines.
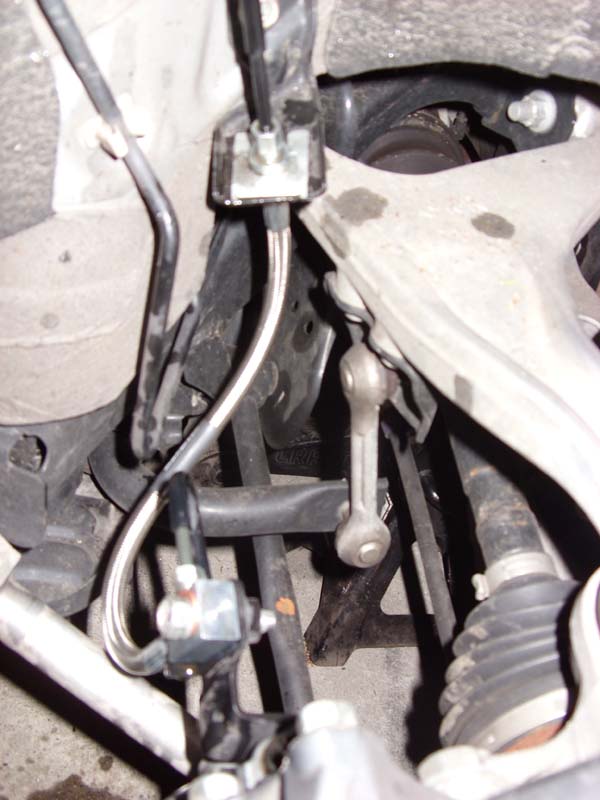
The rear brake lines have one block end fitting just like the stock ones do. Simply remove the hard line going into the block, unbolt the block from the mounting bracket, and unscrew the line from the chassis-side hard line. Remove the mounting clip and remove the line. The new lines come with new clips but you will need to re-use the bolt that holds the block onto the bracket.
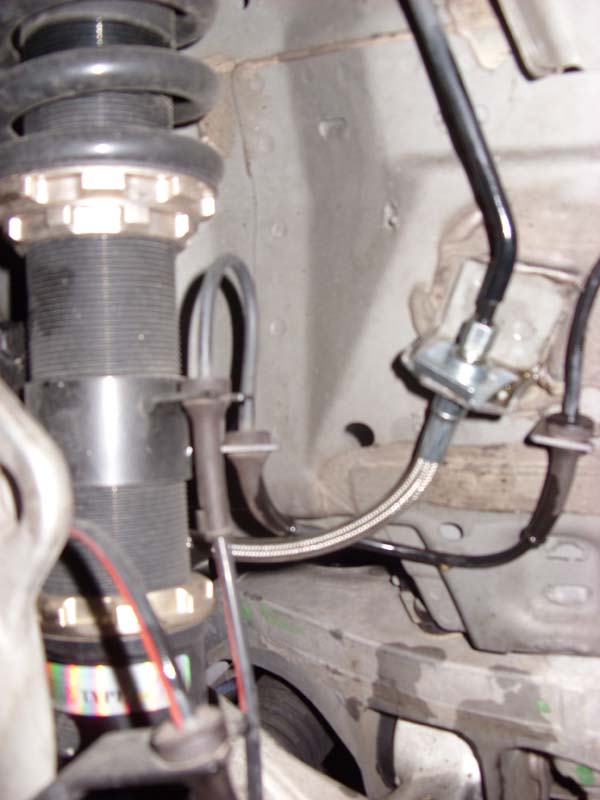
For the front lines, the stock lines have two blocks. The first is mounted onto a bracket on the shock, while the second is on the caliper. Remove both sections of the soft line. The new brake lines come with a pair of mounting brackets for the front lines. Using the original nut, screw a mounting bracket onto the stock mounting point on the shock. Connect the new line at the block end to the caliper hard line, run the new line through the installed mounting bracket, then attach the other end to the chassis-side hard line. Use the stock mounting nut to secure the block to the caliper, and use the provided clips to secure the middle of the line to the installed mounting bracket, and the other end of the line to the chassis.
We also chose to have all 4 rotors turned while we were working on the brakes. Finally, we put the freshly turned rotors back on, the new pads in, and bled the brakes using the Motul 600 brake fluid.
The final issue we wanted to address is the clutch fade we experienced. We believe the clutch fade was due to the clutch fluid boiling, causing the same effect described that can happen with brakes. The clutch line on the G37 runs very close to the exhaust, so this may contribute to the increased fluid temperature. We chose to bleed the clutch using the Motul 600 as well. Just like the brakes, we opened the bleeder on the slave cylinder and pumped out all the original fluid. We then bleed the entire system using the new fluid.
After we finished all these mods, we decided to head back to the track for another track day and see how the car reacted. This time we headed to Roebling Road Raceway in Savannah, GA.
It seems everything we did to the car worked wonderfully. During a 20 minute session on the track, the rev limiter did not decrease like it had in the past. It seems that the oil cooler we added in Part 1 was an excellent performance enhancer. Roebling Road is a fairly high speed track that uses lots of high RPM’s in 3rd and 4th gear. The fact that the car could maintain constant high RPM’s for that duration is proof that the oil cooler was effective. We also did not experience brake fade or clutch fade problems. It seems that the Motul 600 did the trick. The increased brake feel from the new G-Spec brake lines also seemed to help. With all the annoying problems out of the way, we could focus on the “fun mods.” The suspension made a huge difference over stock. We cranked up the shock adjustments to make the suspension stiffer all the way around. The suspension performed flawlessly, decreasing body roll, and increasing the fun factor. It was nice to be in a car that was starting to feel like a real sports car. The best part about it was that at the end of the day we could turn the shocks back down in just a few seconds and enjoy a nice luxury-touring ride back to the hotel.
Stay tuned and keep following along as we progress with our Project G37 build. What will we do next?
View other segments:
Part I: Oil Cooler Install
Part II: Coilovers Install
Part III: Brakes
Part IV: To the Edge of the World and Back
NICOclub is back again with Carlisle Events to host our 18th annual NICOFest Carlisle AutoX…
Kraft Auctions Offers Fans a Chance to Own a Piece of Datsun Racing History
We built Datsun Ranch in 2014, and it was the culmination of a lot of…
Since it's not just Datsuns that are vintage anymore ("classic Nissan" still sounds weird, right?),…
Let's talk about big brake kits for a bit. For the purposes of this article,…
What do these terms mean? Pulsed Secondary Air Injection (PAIR) Valve: The PAIR valve sends…