Special thanks for this write up goes to audtatious (Matt Moody).
Posted with permission from the author.
Use this image as a location reference to the steps below: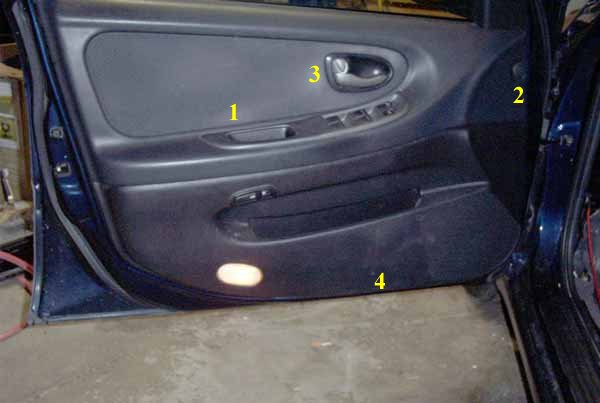
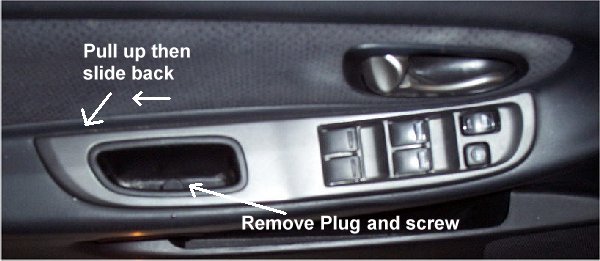
Step 1: Use a flat head screwdriver and remove the plug at the bottom of the “grip” (what you use to close the door from the inside). Remove the Phillips screw. Gently pry the back of the section up. When the grip pocket has cleared the panel, pull backward and the whole assembly should pull out. Disconnect the connectors for the power windows and door locks and put the piece to the side.
Step 2: Gently pry the cover off the panel. Remove the phillips screw underneath.Refer to #2 of the reference image for location.
Step 3: Gently pry off the door handle trim. Start at the back, then using a small flat-head screwdriver, work the piece off by wedging the screwdriver between the trim and the plastic behind the handle to release the clips.
Step 4: The outside edge of the door panel is held to door with plastic clips. Using a panel popper or flat head screwdriver, gently pry the panel away from the bottom of the door. On my car, there was a section below the map pocket that I could put my fingers in and help pull. Once you have the first clip loose, you can run your hand along the edge to disengage the remaining clips. Once disengaged, pull the panel out from the bottom and push upward to disengage the trim at the top. You can either leave the door panel hanging from the wires running to the courtesy light/fuel filler/trunk or you can disconnect them. It’s your call.
——————————————————————————–
Speaker Replacement: Remove the 4 screws holding the factory speaker in place. Disengage the plug attached to the factory speaker. If you are running new speaker wires, good luck. If you are going to use the factory wires from the trunk, then the wire codes are:
Blue w/white = Left positive
Blue w/yellow = Left negative
Brown = Right positive
Brown w/white = Right negative
Reinstall the door panel in reverse order.
Speaker removed from door mount: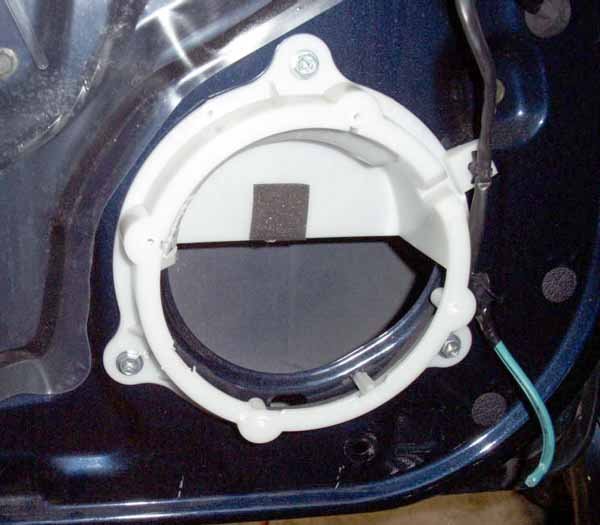
New speaker installed:
——————————————————————————–
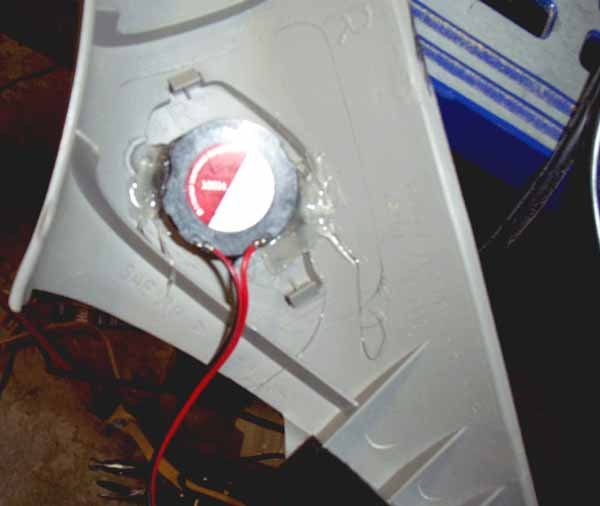
Front Tweeters (panel removal + replacement):
A-Pillar Removal: (See image below for locations) Step 1: Use a flat head screwdriver to remove the A-Pillar by sliding the end under the weatherstripping and rotating it behind the pillar cover. Then, pry the panel off by pulling the screwdriver towards the inside of the vehicle. This should be done appx 3″ from the top of the panel. Once the top of the panel has been released, you can run your fingers down the edge to release the remaining clips while pulling from the top towards the inside of the car. To finish removing the panel, wiggle it while pulling towards the back of the vehicle.

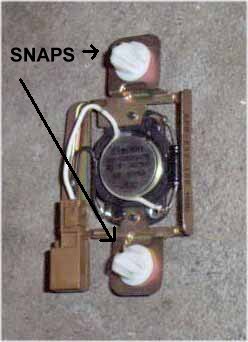
Step 2: The factory tweeter is mounted on a metal bracket and attached to the body via two plastic “snaps”. Use a flathead screwdriver or panel popper to pry the bracket off the A-pillar. Disconnect the wires and set it to the side.Tweeter after removal:
Step 3: There are three ways to mount the new tweeter. You can remove the factory tweeter and modify the mount to accept a new tweeter, you can use two-sided tape to mount the new tweeter in the origional location, or you can hot-glue the new tweeter to the panel (my choice). You can easily run a new speaker wire withthe panel removed.
Step 4: Reinstall the panel in reverse order. Make sure the weatherstripping is properly covering the edge of the panel when completed.
Author, Matt Moody, is a NICO Maxima Moderator and owner of a 2k2 Maxima SE