Article Series
- Restoring a 1968 Datsun 510 Sedan - Meet "Betty"13424
- Restoring a 1968 Datsun 510 Sedan - Front Suspension13440
- Restoring a 1968 Datsun 510 Sedan - Rear Suspension13546
- Restoring a 1968 Datsun 510 Sedan - Differential and Rear Brakes13681
- Restoring a 1968 Datsun 510 Sedan - Wiring with a universal harness13877
- Restoring a 1968 Datsun 510 Sedan - Engine install, door hinges and bumpers!13909
- Restoring a 1968 Datsun 510 Sedan - Weatherstrip and window squeegies13943
- Restoring a 1968 Datsun 510 Sedan - Part 8 - Seats and Wiring14317
- Restoring a 1968 Datsun 510 Sedan - Part 9 - Lighting14339
- Restoring a 1968 Datsun 510 Sedan - Part 10 - Radiator and cooling system14371
- Restoring a 1968 Datsun 510 Sedan - Part 17 - NICOclub19126
Over two years ago, Becky (nissangirl74) and I “adopted” a ’68 510. We’ve been busy restoring and maintaining the rest of our old Datsuns, so she’s been sitting under a canopy here at NICO Headquarters, patiently awaiting her “makeover.”
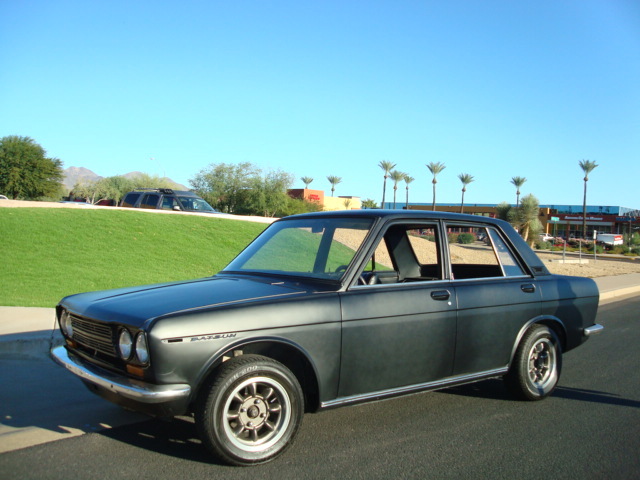
Here’s Betty. As in, “bam-a-lam”. Anyone under 35 can have fun Googling that.

Here’s the article Bex wrote when we first acquired her: “A Dime Makes Nine”
Fast-forward to 2012. Basically, this would be a bit of a “backwards” project. The paint and bodywork was already completely done and immaculate, and the interior had been well-attended to. However, her suspension was shot, the engine bay hadn’t been touched in 40 years, the L16 engine was tired, and the 4-speed simply would not do, especially here in Arizona. On top of that, the wiring harness was a colossal mess, nothing electrical was working, and the prior owner had done some sketchy work that would need to be addressed.
A little backstory – Like all kids who grew up in the 70’s, I’ve always been a huge fan of Smokey & The Bandit, and I’ve wanted to restore a ’77 Trans Am since my very first car. There’s just something about that black and gold Pontiac that screams old-school cool. However, 2 problems: One, an old T/A is hard to come by, and parts are pricey. That type of restoration can get expensive real fast. Two, we build Datsuns. Not Pontiacs. What to do?
One night, over dinner, Bex mentioned, “Why not do a ‘Bandit’-themed Datsun?” Well, hmmm… we *DO* already have a black 510 with good paint. No screaming chicken on the hood, but maybe some old-school gold mesh wheels, the right stance, great handling, more horsepower… Yeah, I like where this is going!
With that, it was decided. The 510 would be our next project, and in order to get me even MORE motivated, we decided to try and get it done in time to debut at JCCS 2012. We debuted “Alice”, our ’67 411 wagon at JCCS 2010, and then “Sheila”, our ’63 right-hand-drive Bluebird at JCCS 2011, and the 510 project was *just* challenging enough to be a stretch to finish in 8 months. Let’s go for it!
Now, another little backstory: Bex and I are at a point in our lives where our future is much more important than our “toys”. It’s not just the economy that has played havoc with our long-term goals. Three teenagers in the house will strain anyone’s budget. Bex is going to school to become an RN, gas prices are up, food prices are up, revenues and salaries are down, and we’re wanting to retire while we’re still young enough to enjoy this all-too-brief life. All in all, we’re finding ourselves being a lot more frugal than we’ve ever been, and restoring old cars can become a real drain on the wallet if you’re not careful. So, I put a cap on the total cash outlay for this restoration: $2000. The rules were simple – We’d do all the work ourselves, buy only the necessities, and trade / barter for anything else needed. Any parts I could sell on ebay would be added to the budget and not count against the total outlay, which would help me clear out some much-needed storage space AND help get this car completed under budget.
So, from here on out, maybe we should call this “How to Build a 510 on a Top Ramen Budget”!
With Bex taking a full complement of classes, she wouldn’t be as heavily involved in this one as she was on the ’67 wagon. My schedule is brutal as well – between my full-time job with the State, managing NICO, and handling all the other tasks that come with a house full of teenagers, time would have to be used wisely if we wanted to finish this one by September 2012. Challenge accepted? Hell yeah. Let’s rock.
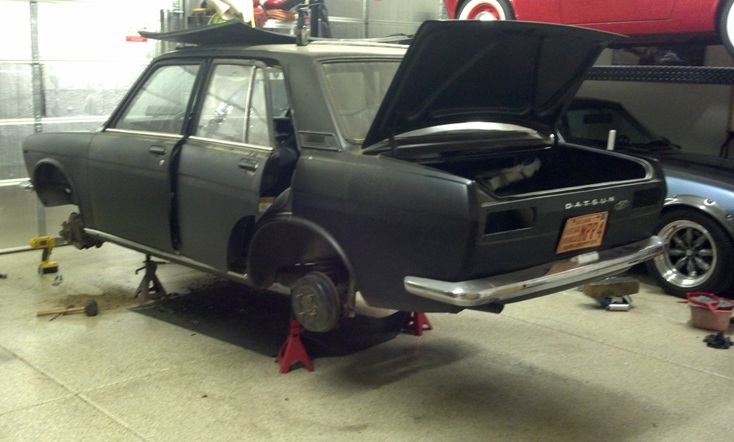
Luckily for us, Jason (rotorimp) had some space where we could temporarily store one of the other Datsuns to free up a spot in the garage. Even though we’re blessed with a lot of space inside, it’s still hard to do a restoration with 4 cars stuffed in a 3-car garage. So, we cleared a space, pushed Betty into the center space, and propped her up on jackstands. This would be her home for the next several months while she got a nearly full-scale makeover.

The super-cool Carroll Shelby wheels had recently gone to a good friend Dale, for use on his pristine 1972 Datsun 1200. I knew we’d want something a little more substantial for the 510, and I knew they were going to a good home, so that was enough to start the project rolling…err, NOT rolling.
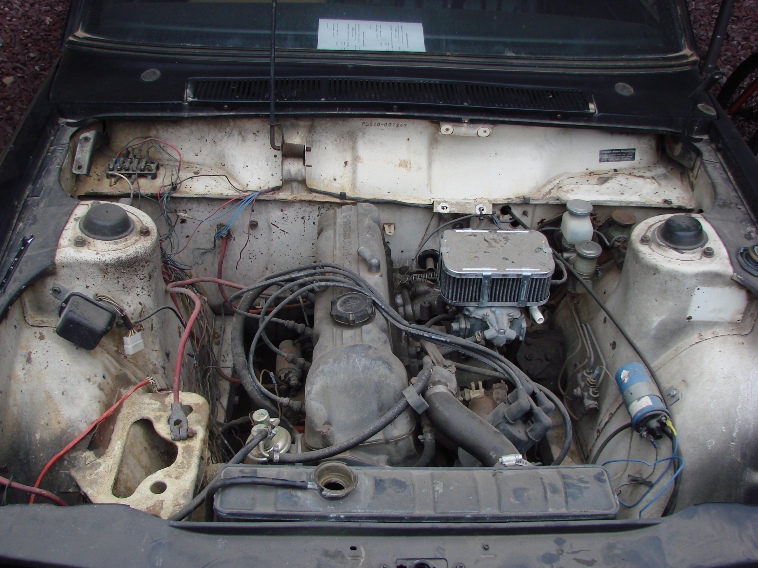
First order of business was to pull the tired L16, a task that was made far easier by the lack of concern for the wiring, hoses, and peripherals. Everything would be replaced anyway, so this was a junkyard-style slash-and-snatch. Despite the countless hours of body and paint work invested by the prior owner, it appeared the hood hadn’t been opened since the 70’s. Can’t drop a fresh new engine into a nappy engine bay, so everything that wasn’t welded in place got removed. Here’s what we started with – YUCK!

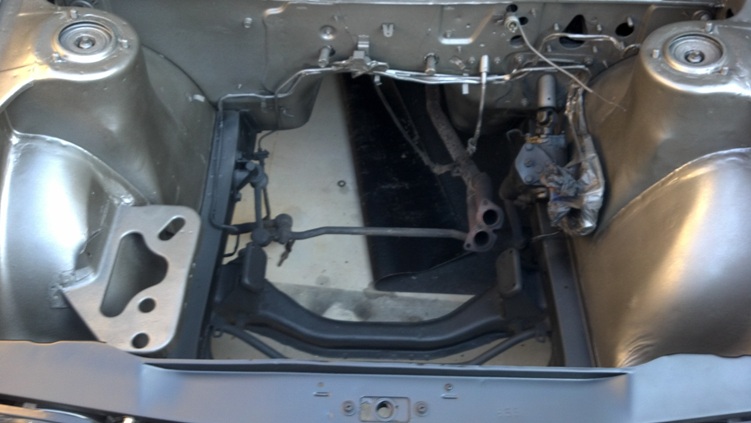
After a good soaking in Gunk and a pressure wash, it didn’t look much better. Odd as it may seem, I started off by restoring the brake lines… sometimes you’ve just got to pick a starting point, and I knew they’d be way harder to do after the engine bay was completed. So, I sat on the crossmember for 2 days with a green scrubbie pad and some metal polish until the brake lines and distribution block were pristine and shiny. Then, I masked them all off and started filling unnecessary holes in the engine bay. I knew I’d be using a GM single-wire alternator, so the voltage regulator, fuse block, and ballast resistor holes were useless. The wiring would be routed cleanly, so a lot of the clip holes could go away too. The battery tray had seen better days, so it needed to be reshaped with a hammer and dolly, and a coat of POR-15 took care of the rust from a past battery failure. Incidentally, this was the only rust I found on the car – Jackpot!
I’d already decided that since the exterior theme would be black and gold, the underhood view should at least partially reflect that. No, we’re not going to do a black and gold engine bay – but I decided that everything should be done in metal tones. Since the engine bay wasn’t ever going to be completely smooth, and this was going to be a driver – not a show car – I decided to refinish the engine bay with some texture. After masking off the rest of the car, I shot the engine bay with one coat of self-etching primer, followed by two coats of heavy-duty paintable truck bedliner, topped off by three coats of DuPont gunmetal grey metallic.

In the meantime, the L16, transmission, Weber carb, coil, 3-core radiator, and some other stuff went on Craigslist to help offset some of the costs that would be coming soon.
Click here for Part 2, where we tackle the SUSPENSION!